
Salesforce Integration
The Live Data integration for Salesforce checks all of your Contact records against the open web to determine if you have the correct company and title for each person. If Live Data finds the person on the open web, a new object will be attached to the Contact record containing the latest information from Live Data.
The Live Data Contact Information object contains information about the person’s current job, including: title and level, contact information, and firmographic data for the company.
Of particular interest is a field called “Job Change Detected Date” – this field is set to the date at which Live Data identified that the person is at a different company than the one provided. This can be used to filter the data provided by Live Data to only show “new job changes” instead of showing all of the data that Live Data has found for the person.
The integration does not modify any existing Contact record fields, or create any new common objects such as Leads, Contacts, or Accounts. It is the responsibility of the customer to decide how to handle these new records and how to integrate them into their existing Salesforce automation.
This page will walk you through the integration steps for Salesforce. The steps are:
- Install the Salesforce integration app
- Create a new Live Data Ledger
- Create credentials for the integration
- Configure the integration
- Example Salesforce automations
- The user must be a Salesforce System Administrator
- The user must have a Live Data account with
adminprivileges
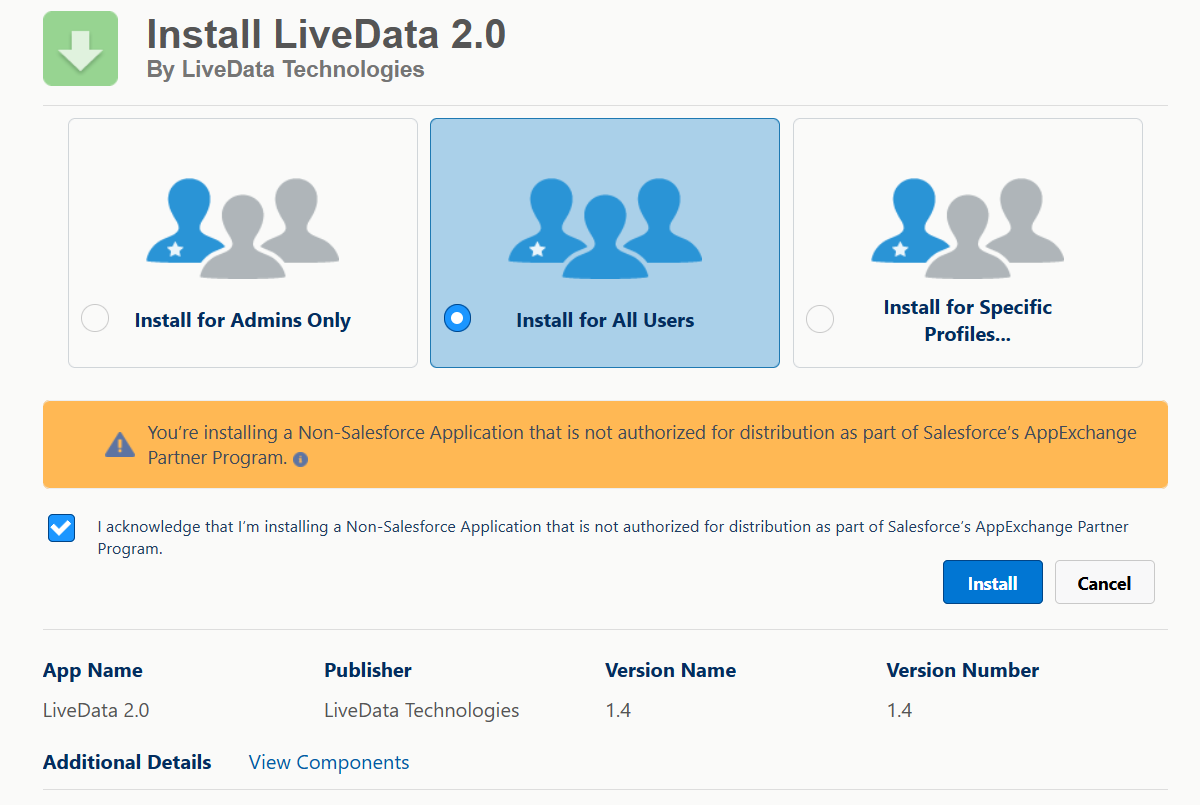
The Salesforce integration app is available through a custom installation link. Please contact your Live Data representative to get the link. Once you have the link, follow the instructions to install the app to your Salesforce instance. Be sure to select the Install for All Users option and press the Install button.
The Salesforce integration will sync your SF contacts to a ledger in Live Data. You will need to log in to Live Data to create a new ledger for this purpose. You can do this by navigating to the Ledgers page in Live Data and clicking the “Create Ledger” button. Once you have created the ledger, you will need to note the ledger ID. You will need this ID in the next step. You can find the ID by clicking on the ledger name in the list of ledgers and observing the URL in your browser. The part beginning with l_ is the ledger ID.
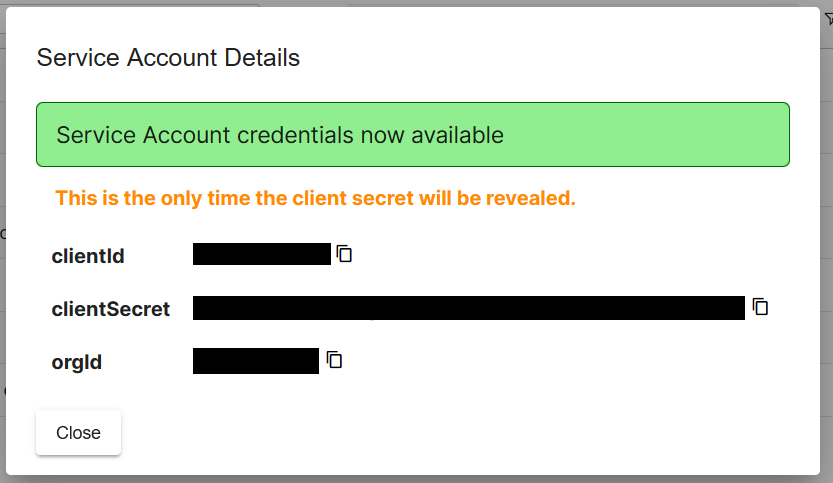
The Salesforce integration will use a set of credentials to authenticate with Live Data. You will need to create a new set of credentials for this purpose. You can do this by navigating to the Team page in Live Data and clicking the “Service Accounts” tab. Create a new Service Account with the editor role and note the credentials (the client_id, client_secret, and org ID). You will need these credentials in the next step.
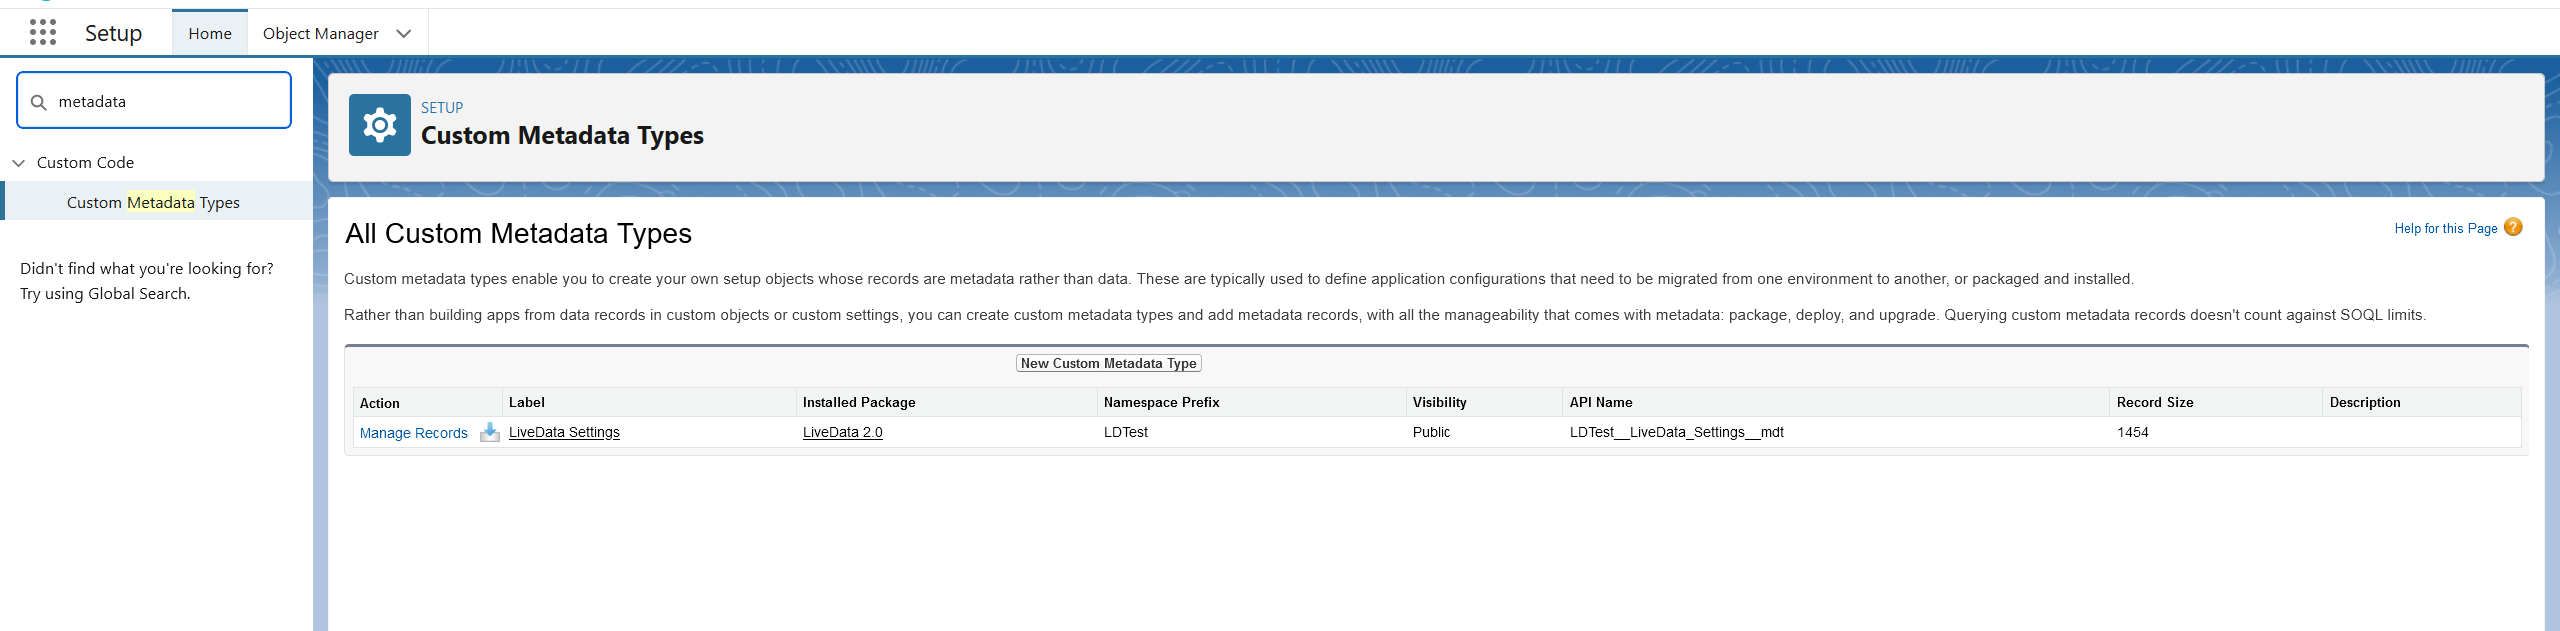
The Salesforce integration app will be installed as a custom object in your Salesforce instance. You will need to set some custom field values for the integration to begin working. In Salesforce, navigate to the Setup menu and the Custom Metadata Types page. Find the type labeled LiveData Settings and click the Manage Records button.
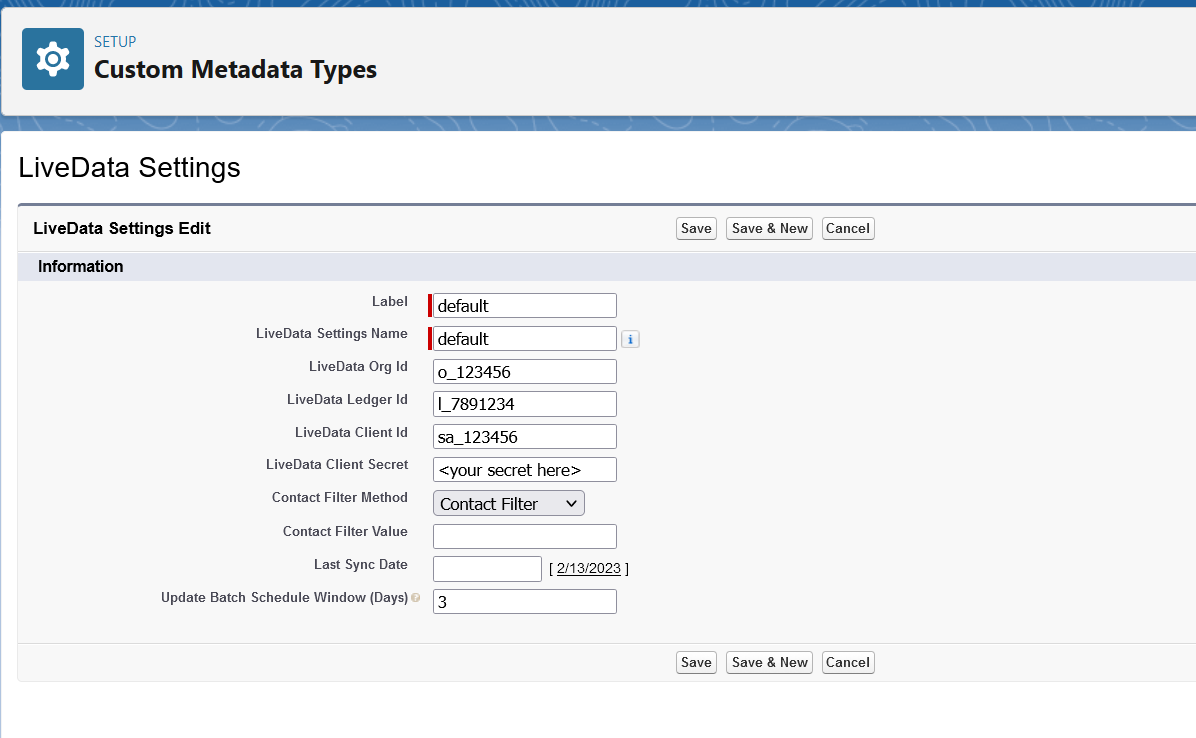
Click the New button to create a new record. You will need to set the following fields:
Label-Default(do not change this value)LiveData Org ID- The org ID you noted in the previous stepLiveData Client ID- The client ID you noted in the previous stepLiveData Client Secret- The client secret you noted in the previous stepLiveData Ledger ID- The ledger ID you noted in the previous step
(For a description of the other settings, see Advanced Configuration below.)
Press Save.
Optionally, if you have a field in your Contact record that represents the LinkedIn URL for a contact, you can choose to map that field to Live Data to help with the match rates. The value of this field can be in any format. To instruct the integration to use this field, you must add a Custom Setting to the integration by following the steps below.
In Salesforce, navigate to the Setup menu and the Custom Settings page under the Custom Code group. Find the type labeled LiveData Advanced Settings and click the Manage button. Press the New button to create a new record. You will need to set the following fields:
Name-Contact LinkedIn Field(do not change this value)Value- The API name of the field in your Contact record that contains the LinkedIn URL. For example, if your field is calledLinkedIn_URL__c, you would enterLinkedIn_URL__cin this field.
Press Save.

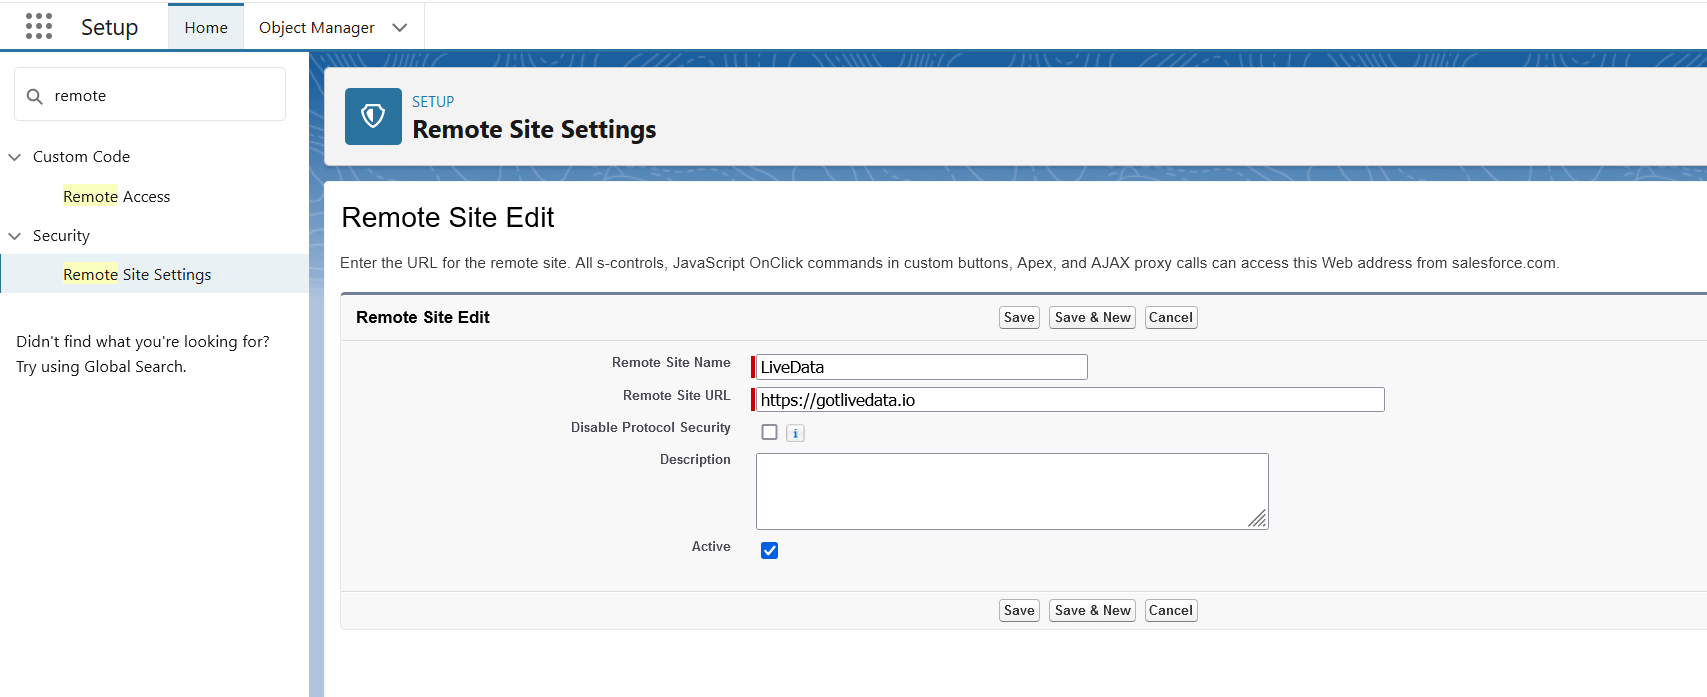
In the Salesforce Setup app, search for Remote Site Settings and click the Remote Site Settings link. Click the New Remote Site button. Enter the following values:
Remote Site Name-LiveDataRemote Site URL-https://gotlivedata.io
Press Save.
By default, the integration creates Apex jobs on a schedule to sync with Live Data (both to send new SF contacts to Live Data and to receive job update data from Live Data) nightly. You can modify this schedule if desired (see below).
Note: By default, using these instructions will send all contacts to Live Data. If you would like more granular control over which contacts are sent, see the section below on creating a flag to send contacts to Live Data.
After installing the integration, you can manually trigger the integration to sync contacts to Live Data through the Live Data App in Salesforce. Click on the Salesforce App Launcher icon and search for LiveData. Click the LiveData app. Click the Send Contacts to Ledger button. This will trigger the integration to sync all contacts to Live Data. Press the Send Contacts to Ledger button to sync from Salesforce to Live Data. The data may take some time to sync. You can check the status of the sync by logging in to Live Data and clicking on the Imports tab for the corresponding Ledger. As contact data is initially verified, the import will show a processing status. Once all data has been initially verified, the import will show a completed status.
At any time, you can also use the Sync Updates from LiveData button to get the latest contact data from Live Data.
The Salesforce integration creates a new Object type called LiveData Contact Information. This object stores the latest contact information from Live Data. You can use this object to create automations and reports in Salesforce. Some examples are below, but these are just a few of the many possibilities.
In the Salesforce Setup app, search for Object Manager and click the Object Manager link. Click the Contact object from the list and then the Page Layouts menu. Select the layout on which you want to add Live Data, or the Contact Layout by default. In the top gray box, on the left-hand side, select Related Lists and then find the Live Data Contact Information object. Drag this object down and place it where you want it in relation to other related lists.
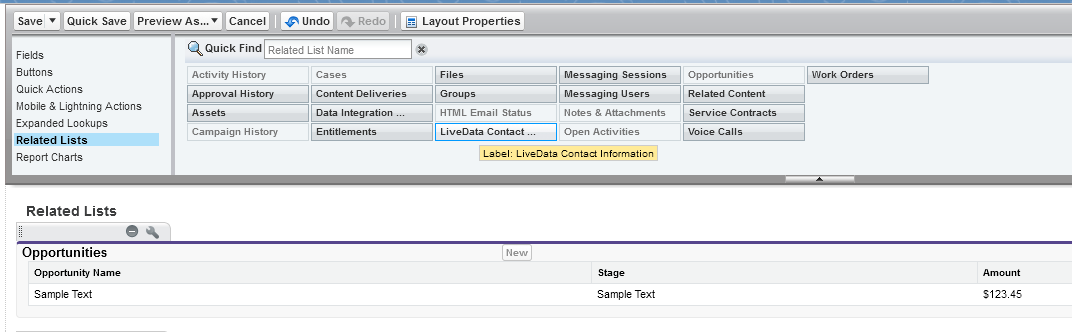
Click the wrench icon on the panel to define which fields to show in the panel. We recommend including, at a minimum: Live Data Contact Information Name, Current Company, Contact Title, Contact Title Level, Contact Email, Contact Email Status, and Job Start Date.
Expand the Buttons section and un-select all buttons.
Press OK on the dialog, and then Save in the top gray box to save the layout.
Navigate to the Reports section in Salesforce and press the New Report button. Use the search bar to search for Live Data and select the Live Data Contact Information with Contact menu item and press Start Report. Add any combination of columns to the report to meet your needs – a good basic default list of fields would be: Contact: First Name, Contact: Last Name, Live Data: Current Company Name, Live Data: Contact Title, Live Data: Contact Title Level, Live Data: Contact Email, Live Data: Job Start Date, Account: Name, Contact: Title.
If you want a report that only shows the records for which Live Data has detected an actual job change, you can filter on the field Job Change Detected Date being any date after the installation date of the integration. This will filter the report so that only those people with a new job are showing.
Name the report to your liking (e.g. Live Data Contact Updates) and press Save.
| Field Label | Field Description |
|---|---|
| Contact Email | The current email address of this contact, if known |
| Contact Email Status | The status of the email address. ‘valid’ denotes a valid email, ‘catch-all’ denotes a mail server that does not validate emails, and ‘best-guess’ denotes a likely email address that could not be positively confirmed. |
| Contact LinkedIn URL | The LinkedIn URL for this contact |
| Contact Name | The customer-provided name for this contact |
| Contact Title | The current job title of this contact |
| Contact Title Level | The inferred level of the current job, based on their title. |
| Contact Title Function | The inferred domain of the current job, based on their title. |
| Current Company Domain | The top-level domain name for the current company. |
| Current Company Industry | The industry of the current company. |
| Current Company LinkedIn URL | The LinkedIn URL for this company |
| Current Company Location | The geographic location of the company headquarters. |
| Current Company Name | The current company that employs this contact |
| Current Company Size | The size of the current company. |
| Imported Company | The name of the company that this contact was imported with |
| Imported LinkedIn URL | The LinkedIn URL that this contact was imported with |
| Imported Title | The job title this contact was imported with |
| Imported Title Level | The inferred level of the title this contact was imported with. |
| Imported Title Function | The inferred domain of the title this contact was imported with. |
| Info Change Date | The last time (in UTC) Live Data updated any of this persons information on this ledger. A blank value indicates there has been no change from the imported data. |
| Job Change Detected Date | The last time (in UTC) Live Data updated this persons job on this ledger. A blank value indicates there has been no change from the imported data. |
| Job Start Date | The date that this person started at their current job |
Optionally, you can create a flag on Contact objects to indicate whether or not the contact should be sent to Live Data. This will allow you to control which contacts are sent to Live Data. To do this, navigate to the Setup menu and the Object Manager page. Find and select the Contact object. Click the Fields & Relationships tab. Click the New button. Enter the following values:
Data Type- select the “Checkbox” optionField Label- anything you want, recommend “Send to Live Data”Default Value- either option,Checkedis recommendedField Name- use the default or set to something unique
Complete the new field wizard with values of your choosing for security and views.
Once completed, go back to the Fields and Relationships tab and select the field you just created. Locate the value of the API Name field. You will need this value in the next step.
Navigate to the application metadata settings via the Setup menu and the Custom Metadata Types menu option. Select Manage Settings for the LiveData application and select the Default settings you created in prior steps. Set the Contact Filter Method to Contact Filter and set the Contact Filter Value field to the API Name of the field created in the previous step. Press Save.
Now you can set that flag on contacts to indicate whether or not they should be sent to Live Data. If the flag is set to true, the contact will be sent to Live Data. If the flag is set to false, the contact will not be sent to Live Data.
After setting the flag on at least one contact, you can follow the steps above in the “Triggering/Testing the Integration” section to manually trigger the integration to sync contacts to Live Data.
Advanced Option
Generally speaking, there is no need to change the job schedule. The default schedule is sufficient for most use cases. Changing the schedule may require additional configuration.
By default, the integration creates Apex jobs on a schedule to sync with Live Data (both to send new SF contacts to Live Data and to receive job update data from Live Data) nightly at 11pm. This schedule can be modified, but the integration may need to be reconfigured. To modify the schedule, navigate to the Setup menu and the Apex Classes page and click on Schedule Apex. Click the New Schedule button. The following are the two class names that can be configured for Live Data:
LiveData_InitializeContactsBatchLiveData_RetrieveUpdatesBatch
If the schedule is changed, you need to change a corresponding setting for the Live Data integration. As described above in the “Configurethe custom app metadata” section, you need to edit the LiveData Settings custom metadata type. Set the Update Batch Schedule Window (Days) field to the currently configured duration + 1. For example, a nightly schedule should be set to 2. A weekly schedule should be set to 8.
There is a field called Live Data Sync Status on the Contact object. This field is used to store the status of the last sync with Live Data.
Pages
| Action | Component Name | Parent Object | Component Type | Installation Notes |
|---|---|---|---|---|
| Create | Live Data | Visualforce Page | This is a brand new component. |
Code
| Action | Component Name | Parent Object | Component Type | Installation Notes |
|---|---|---|---|---|
| Create | Live_Data_Controller | Apex Class | This is a brand new component. | |
| Create | Live_Data_Test | Apex Class | This is a brand new component. | |
| Create | Live_Data_RetrieveUpdatesBatch | Apex Class | This is a brand new component. | |
| Create | Live_Data_Utility | Apex Class | This is a brand new component. | |
| Create | PostInstaller | Apex Class | This is a brand new component. | |
| Create | Live_Data_InitializeContactsBatch | Apex Class | This is a brand new component. |
Objects
| Action | Component Name | Parent Object | Component Type | Installation Notes |
|---|---|---|---|---|
| Create | Live Data Contact Information | Custom Object | This is a brand new component. | |
| Create | Live Data Settings | Custom Metadata Type | This is a brand new component. | |
| Create | LiveData Advanced Setting | Custom Object | This is a brand new component. |
Permission Sets
| Action | Component Name | Parent Object | Component Type | Installation Notes |
|---|---|---|---|---|
| Create | Live Data Admin Permission Set | Permission Set | This is a brand new component. | |
| Create | Live Data User Permission Set | Permission Set | This is a brand new component. |
Resources
| Action | Component Name | Parent Object | Component Type | Installation Notes |
|---|---|---|---|---|
| Create | Live Data Settings Layout | Live_Data_Settings__mdt | Page Layout | This is a brand new component. |
| Create | Live Data Contact Information Layout | Live_Data_Contact_Information__c | Page Layout | This is a brand new component. |
Fields
| Action | Component Name | Parent Object | Component Type | Installation Notes |
|---|---|---|---|---|
| Create | Contact Title | Live_Data_Contact_Information__c | Custom Field | This is a brand new component. |
| Create | Contact Email Status | Live_Data_Contact_Information__c | Custom Field | This is a brand new component. |
| Create | Current Company Domain | Live_Data_Contact_Information__c | Custom Field | This is a brand new component. |
| Create | Current Company Location | Live_Data_Contact_Information__c | Custom Field | This is a brand new component. |
| Create | Contact | Live_Data_Contact_Information__c | Custom Field | This is a brand new component. |
| Create | Live Data Org Id | Live_Data_Settings__mdt | Custom Field | This is a brand new component. |
| Create | Current Company Industry | Live_Data_Contact_Information__c | Custom Field | This is a brand new component. |
| Create | Imported Title Function | Live_Data_Contact_Information__c | Custom Field | This is a brand new component. |
| Create | Live Data Sync Status | Contact | Custom Field | This is a brand new component. |
| Create | Job Change Detected Date | Live_Data_Contact_Information__c | Custom Field | This is a brand new component. |
| Create | Current Company Size | Live_Data_Contact_Information__c | Custom Field | This is a brand new component. |
| Create | Imported Company | Live_Data_Contact_Information__c | Custom Field | This is a brand new component. |
| Create | Contact Filter Method | Live_Data_Settings__mdt | Custom Field | This is a brand new component. |
| Create | Contact Name | Live_Data_Contact_Information__c | Custom Field | This is a brand new component. |
| Create | Live Data Client Id | Live_Data_Settings__mdt | Custom Field | This is a brand new component. |
| Create | Live Data Ledger Id | Live_Data_Settings__mdt | Custom Field | This is a brand new component. |
| Create | Contact Filter Value | Live_Data_Settings__mdt | Custom Field | This is a brand new component. |
| Create | Current Company Name | Live_Data_Contact_Information__c | Custom Field | This is a brand new component. |
| Create | Imported Title | Live_Data_Contact_Information__c | Custom Field | This is a brand new component. |
| Create | Job Start Date | Live_Data_Contact_Information__c | Custom Field | This is a brand new component. |
| Create | Live Data Client Secret | Live_Data_Settings__mdt | Custom Field | This is a brand new component. |
| Create | Info Change Date | Live_Data_Contact_Information__c | Custom Field | This is a brand new component. |
| Create | Current Company LinkedIn URL | Live_Data_Contact_Information__c | Custom Field | This is a brand new component. |
| Create | Contact Title Level | Live_Data_Contact_Information__c | Custom Field | This is a brand new component. |
| Create | Imported Title Level | Live_Data_Contact_Information__c | Custom Field | This is a brand new component. |
| Create | Contact Email | Live_Data_Contact_Information__c | Custom Field | This is a brand new component. |
| Create | Contact LinkedIn URL | Live_Data_Contact_Information__c | Custom Field | This is a brand new component. |
| Create | Value | Live_Data_Advanced_Setting__c | Custom Field | This is a brand new component. |
| Create | Contact Title Function | Live_Data_Contact_Information__c | Custom Field | This is a brand new component. |
Tabs
| Action | Component Name | Parent Object | Component Type | Installation Notes |
|---|---|---|---|---|
| Create | Live Data | Tab | This is a brand new component. |